Pages

Tuesday, October 23, 2012

DIY Marble Nails

I'm one of those people that gets bored with solid nail colors. I've sported stripes, polka dots,  & chevron prints, all of which I've done myself! One type of nail decor I hadn't tried yet was a swirly, marble-like mix of colors, so I decided to do it myself!

Inspiration:


Getting Started!

What you will need:


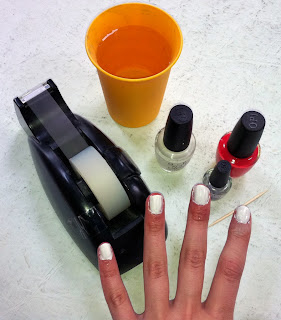
  • White Nail Polish (base coat)
  • 2+ Nail Polish colors of your choice
  • Clear Nail Polish (finish)
  • 1 glass or bowl of water
  • Scotch tape
  • 1 toothpick
  • 2 hands in need of a manicure! ;)

Step 1:

Paint your nails white so the swirled polish will show up nice and bright!


Step 2:

Tape your fingers as best as you can around your nailbeds with scotch tape (it's okay if some spots of skin are exposed!)


Step 3:

One by one, put drops of nail polish into the cup of water in any order to create a ring effect (I only used 2 colors so I just alternated colors)


Step 4:

Take toothpick to create a design of your liking (remember that each nail is going to look different, so don't fret if your in-water design isn't exactly what you want!)


Step 5:

One by one, dip nails into water. I found that the best approach is to have the nail hit the water before the rest of the finger so that it picks up most of the polish. When your fingers are in the water, take the toothpick and collect all the excess nail polish in the surrounding water so when you pull your finger out it doesn't ruin the design.


Thumbs too!


It will look kind of messy at first with extra polish on the tape, but you'll see that each nail is unique and received a good variety of color :)


Step 6:

Remove tape from fingers


Step 7:

Use cotton Q-tip and nail polish remover around nails to remove any excess polish that might have gotten on your skin.

Step 8:

Apply clear coat of nail polish for a glossy, finished look and protection!


And you're done!

So simple, more unique than stick on nails, and you can brag about how you did it yourself!

& for the best part..

Total cost:
Free! You probably have all of the supplies needed already!

Go ahead & shoot your nail lady a text to cancel this week's appointment, tell her you're going to DIY!

Stay tuned for more from ReVamped Vintage!!

- A.P.

Monday, October 22, 2012

DIY Chevron Print Frame

I know Halloween hasn't occurred yet, but Christmas items are already in the stores! What better gift than a hand painted frame! Chevron prints are such a fun way to add excitement to your living room or bedroom.

Anthropology $22.00

Lets Get Started!
What you will need is primer (if the frame isn't a bland square of raw wood), paint (I chose white and Teal), a paint brush and a ruler, and something to put under your frame so paint doesn't get on your work surface.
You can purchase paint at your local craft store I got mine at Michael's.

Next, you will need to prime old frames that you want to spruce up! Priming your frames will allow you to have the bold colors without a second coat or get rid of an existing design on a frame so you can start with a blank canvas.
Once the primer is done drying you can start drawing on your chevron design.

When you draw your lines on the frame make sure to use pencil and start at the corner. Place you ruler slanted along the edge. Decide the width of the chevron stripe that you want I did mine a quarter of an inch thick; therefore I placed the ruler a quarter of an inch from the first line. Next, mirror the two lines that you just created. Repeat this process all the way down the frame.
Next, paint in the lines that you made! Use a brush around the same width of the stripe it will make it easier!
Once your frame dries put in a picture! I loved how my frame turned out so much I decided to make more!

Another fun idea is to hot glue on shells for a cute finish!
Enjoy!
-CM


Wednesday, October 17, 2012

DIY Halloween Skeleton Costume

Are you still unsure about your Halloween costume because you don't want to dish out the money for something that you're only going to wear one night ?

I was in the same predicament earlier this week when a friend asked me about my costume and I zero ideas....but, after some searching for inspiration and I ended up finding the perfect halloween costume for just under 5 bucks!


WILDFOX BATHING SUIT

+

FACE MAKEUP

=

A SKELETON !


What you will need:
- computer & printer (free)
- card-stock paper for skeleton stencil ($0.35)
- leotard, dress, shirt, or any fabric (closet)
- foam brush ($0.50)
- fabric paint ($1.95)
- small scissors (exacto knife* is preferred)
- hole puncher *


LET'S GET STARTED!


1. First thing you need to do is print out the skeleton stencil above. I made the stencil on Adobe Illustrator and Photoshop, but it wasn't able to upload as a file so I made it into the largest picture I could find... However if you have these 2 programs you can try and open them in there!


2. For an easier start if you have an exacto knife, slowly cut out the stencil on a solid backing or if you only have scissors, punch holes in the stencil so you have an easier place to start and if its too far in, continue punching holes as you cut and get closer to the center.

** Tips: Color in the stencil with a highlighter or marker so you don't get confused on which areas you are cutting out!


2. Once you are finished cutting place over any type of item or fabric you want the skeleton design to be on and tape around the outer edges of the card-stock paper to hold in place.


3. Now dip you foam brush into the paint and lightly dab onto the fabric vertically so it doesn't smear underneath the stencil.


4. Take off stencil and its all done! It's that easy!


**Extra Tip: Instead of using paint use tacky glue and add glitter in between steps 3 and 4 to get a more glam look!


WILDFOX:
$107.00 - $ 249.00

REVAMPED VINTAGE :
$ 3.00 - $ 15.00


Hope you liked our holiday DIY for Revamped Vintage!! 
Have a Happy Halloween :) 
-Y.R.

Monday, October 8, 2012

It's All About the Prints!


Want an easy way to get a great look for fall? All you need is a sponge, scissors, paint, and a sponge!
Find an old Tee that you want to put a fun print on...I got my white tee at H & M for three bucks!

Next find a fun print that you are inspired by!! I surfed my favorite website Pintrest and found this...
I drew triangles on the sponge with a sharpie to create a stamp
and cut the sponge on the black lines.
Next lay your tee flat on a smooth surface and dip your sponge in paint. Dip your sponge a few times on paper so the paint isn't on too thick.
Before you stamp your stamp on your tee make sure you place a sheet of paper between the body of the shirt so the paint doesn't bleed to the back of the shirt. 
Then make your first stamp! Make sure you press hard on all edges so the shape transfers.

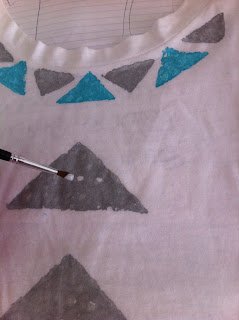
If your Sponge leaves circles you can leave them for an edge or pain the holes in with a small paint brush like I did.

Wait for the paint to dry before wearing and then your done!!!


-chloe